1
2
3
4
5
6
7
8
9
10
11
12
13
14
15
16
17
18
19
20
21
22
23
24
25
26
27
28
29
30
31
32
33
34
35
36
37
38
39
40
41
42
43
44
45
46
47
48
49
50
51
52
53
54
55
56
57
58
59
60
61
62
63
64
65
66
67
68
69
70
71
72
73
74
75
76
77
78
79
80
81
82
83
84
85
86
87
88
89
90
91
92
93
94
95
96
97
98
99
100
101
102
103
104
105
106
107
108
109
110
111
112
113
114
115
116
117
118
119
120
121
122
123
124
125
|
Pixelated User Agent
====================
[](https://circleci.com/gh/pixelated/pixelated-user-agent)
[](https://coveralls.io/r/pixelated/pixelated-user-agent?branch=master)
[](http://waffle.io/pixelated/pixelated-user-agent)
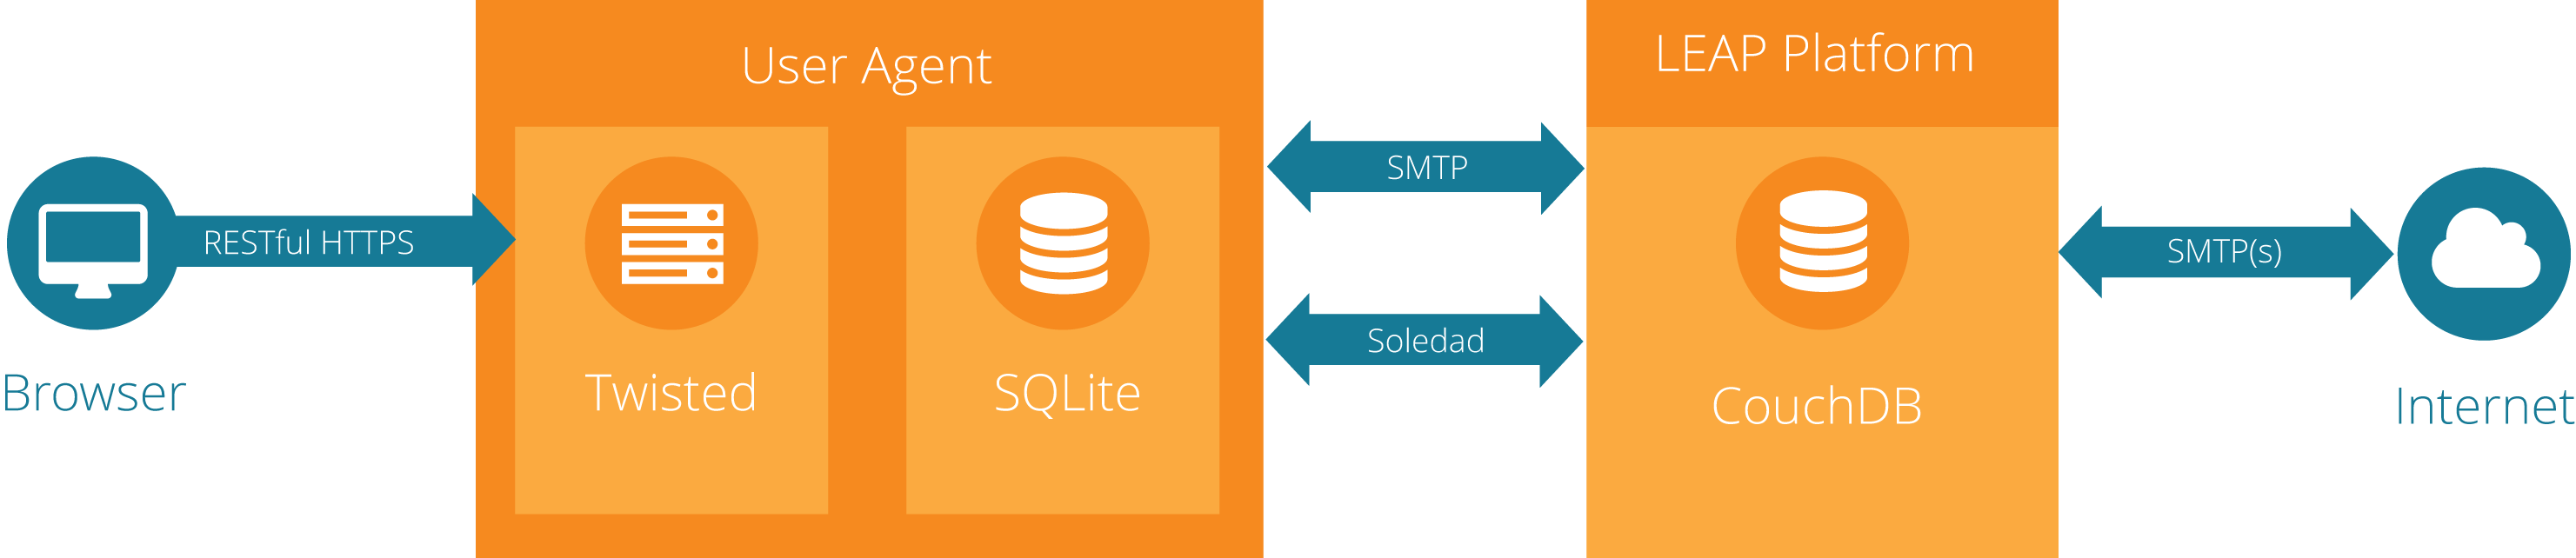
The Pixelated User Agent is the email client of the Pixelated ecosystem. It is composed of two parts, a web interface written in JavaScript ([FlightJS](https://flightjs.github.io/) and [React](https://facebook.github.io/react/)) and a Python API that interacts with a [LEAP Provider](https://leap.se/), the email platform that Pixelated is built on.
Here's a [podcast](https://soundcloud.com/thoughtworks/pixelated-why-secure-communication-is-essential) that explains the project.
**Pixelated is still in early development state!**
## Getting started
You are most welcome to contribute to the pixelated user agent code base. Please have a look at the [contributions how to](https://github.com/pixelated/pixelated-user-agent/blob/master/CONTRIBUTING.md).
## Installing Pixelated
To run your own instance of Pixelated, follow these instructions: https://github.com/pixelated/puppet-pixelated#manual-installation
## Development
If you want to run and test it locally, then before you have to install the following dependencies:
* [Vagrant](https://www.vagrantup.com/downloads.html), Vagrant is a tool that automates the setup of a virtual machine with the development environment
* A vagrant [compatible provider](https://www.vagrantup.com/docs/providers/), e.g. [Virtual Box](https://www.virtualbox.org/wiki/Downloads).
### Option 1: Run Pixelated User Agent against an existing LEAP provider
1) If you don't have access to an existing LEAP provider, you can create an account at [Bitmask mail demo provider](https://mail.bitmask.net/).
2) Clone the Pixelated User Agent repo and start the virtual machine (downloads 600MB, you may want get a coffee or tea in the meantime):
```
$ git clone https://github.com/pixelated/pixelated-user-agent.git
$ cd pixelated-user-agent
$ vagrant up
```
3) Log into the VM:
* You can access the guest OS shell via the command `vagrant ssh` run within the `pixelated-user-agent/` folder in the host OS.
* /vagrant/ in the guest OS is mapped to the pixelated-user-agent/ folder in the host OS. File changes on either side will reflect in the other.
```
$ vagrant ssh
$ cd /vagrant
```
4) Start the pixelated user agent:
```
$ pixelated-user-agent --host 0.0.0.0 --multi-user --provider=mail.bitmask.net
```
5) Go to [localhost:3333](http://localhost:3333/) on your browser. You should see the login screen, where you can put your username and password created on step 1. Once you login, you'll see your inbox.
First time email sync could be slow, please be patient. This could be the case if you have a lot of emails and it is the first time you setup the user agent on your machine.
#### How to get start with development?
See the [Starting Development page](https://github.com/pixelated/pixelated-user-agent/wiki/Starting-Development)
### Option 2: Pixelated User Agent + Leap Platform
You can install the Pixelated User Agent and the Leap Platform at once, just by running the following command on your console (this may take a while, please be patient):
```bash
curl https://raw.githubusercontent.com/pixelated/puppet-pixelated/master/vagrant_platform.sh | sh
```
Once installed, you can create accounts by visiting the LEAP Webapp at [localhost:4443/signup](https://localhost:4443/signup) and see Pixelated in action at [localhost:8080](https://localhost:8080/).
NOTE: Be aware that you will not be able to send mails outside, but you can test sending mails internally from one user to another.
## Debian package
If you just want to try the user agent with debian packages. See [this page](https://github.com/pixelated/pixelated-user-agent/wiki/Debian-package).
## Running tests
[Here](https://github.com/pixelated/pixelated-user-agent/wiki/Running-Tests) you will find informations about how to run Pixelated tests.
# Further Notes
## Multi User Mode
To run the pixelated user agent multi user mode, please run the following:
```bash
vagrant@jessie:/vagrant$ pixelated-user-agent --host 0.0.0.0 --multi-user --provider=dev.pixelated-project.org
```
You will need to change `dev.pixelated-project.org` to the hostname of the leap provider that you will be using.
Once that is done, you can use by browsing to [http://localhost:3333](http://localhost:3333), where you will be prompted for your email username and password.
## Config file with credentials
Create a config file with `ini` format in the root directory, see the example:
*credentials.ini*
```
[pixelated]
HOST=0.0.0.0
PORT=8080
leap_server_name=<your_provider>
leap_username=<your_username>
leap_password=<your_password>
```
Host and port is optional.
To use it, start the user agent like this:
`$ pixelated-user-agent --host 0.0.0.0 --config credentials.ini`
## How to translate the user interface
See: [Translating Pixelated](https://github.com/pixelated/pixelated-user-agent/wiki/Translating-Pixelated)
## More informations
Read the [wiki pages](https://github.com/pixelated/pixelated-user-agent/wiki)
|
