1
2
3
4
5
6
7
8
9
10
11
12
13
14
15
16
17
18
19
20
21
22
23
24
25
26
27
28
29
30
31
32
33
34
35
36
37
38
39
40
41
42
43
44
45
46
47
48
49
50
51
52
53
54
55
56
57
58
59
60
61
62
63
64
65
66
67
68
69
70
71
72
73
74
75
76
77
78
79
80
81
82
83
84
85
86
87
88
89
90
91
92
93
94
95
96
97
98
99
100
101
102
103
104
105
106
107
108
109
110
111
112
113
114
115
116
117
118
119
120
121
122
123
124
125
126
127
128
129
130
131
132
133
134
135
136
137
138
139
140
141
142
143
144
145
146
147
148
149
150
151
152
153
154
155
156
157
158
159
160
161
162
163
164
165
166
167
168
169
170
171
172
173
174
175
176
177
178
179
180
181
182
183
184
185
186
187
188
189
190
191
192
193
194
195
196
197
198
199
200
201
202
203
204
205
206
207
208
209
210
211
212
213
214
215
216
217
218
219
220
221
222
223
224
225
226
227
228
229
230
231
232
233
234
235
236
237
238
239
240
241
242
243
244
245
246
247
248
249
250
|
Pixelated User Agent
====================
[](https://circleci.com/gh/pixelated/pixelated-user-agent)
[](https://coveralls.io/r/pixelated/pixelated-user-agent?branch=master)
[](http://waffle.io/pixelated/pixelated-user-agent)
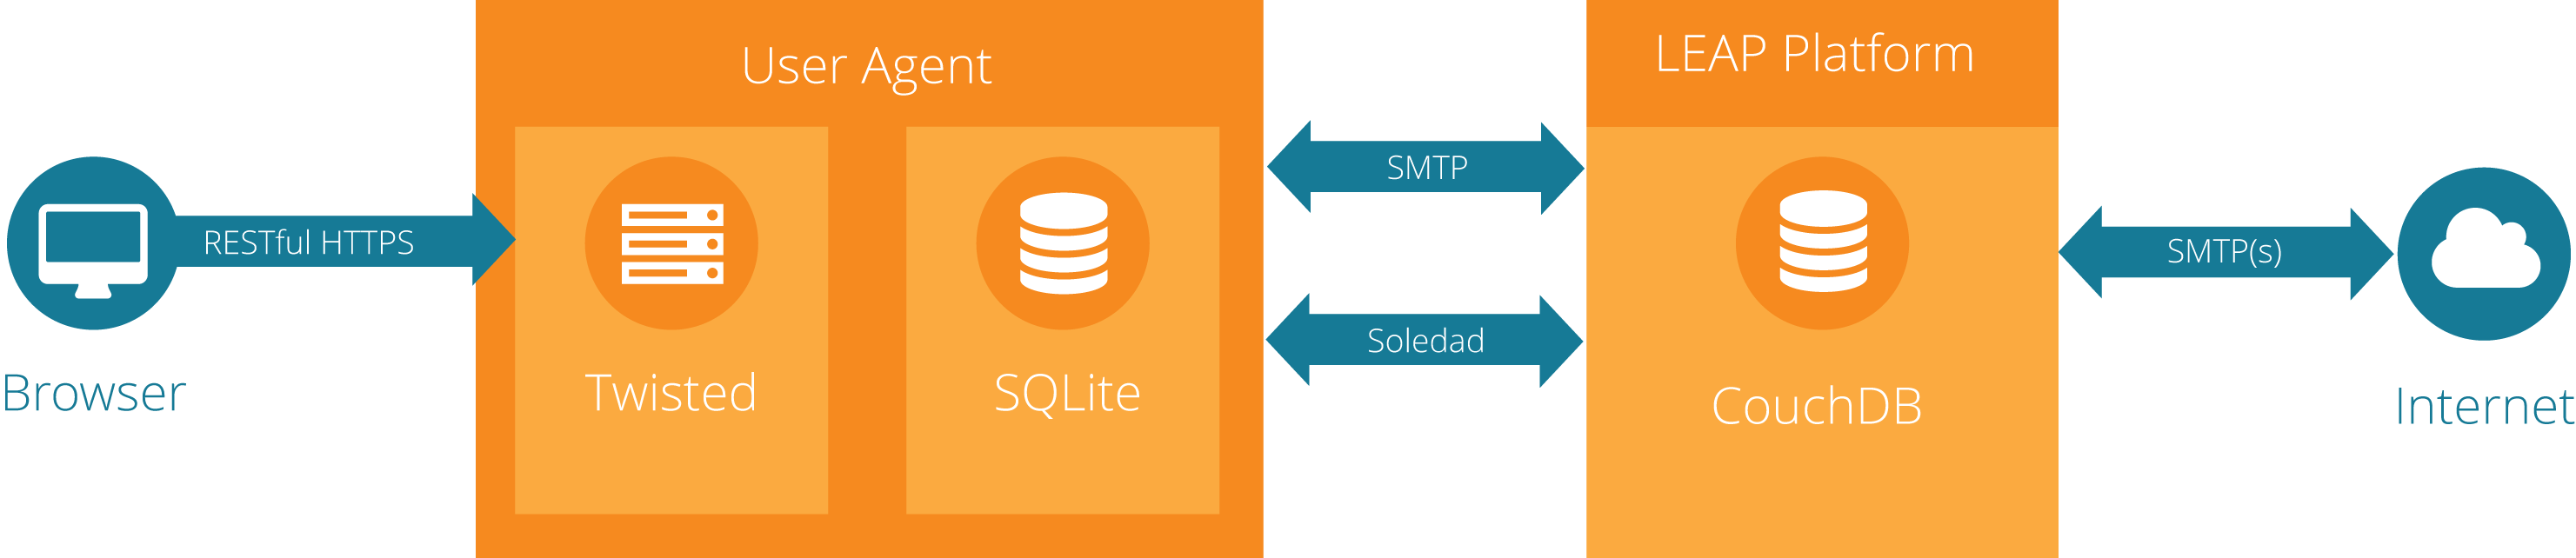
The Pixelated User Agent is the mail client of the Pixelated ecosystem. It is composed of two parts, a web interface written in JavaScript ([FlightJS](https://flightjs.github.io/)) and a Python API that interacts with a LEAP Provider, the e-mail platform that Pixelated is built on.
Here's a [podcast](https://soundcloud.com/thoughtworks/pixelated-why-secure-communication-is-essential) that explains the project.
**Pixelated is still in early development state!**
## Try it!
If you are curious, have a look at the pixelated web client, it as simple as clicking *[here!](https://try.pixelated-project.org:8080/)*
## Getting started
You are most welcome to contribute to the pixelated user agent code base. Please have a look at the [contributions how to](https://github.com/pixelated/pixelated-user-agent/blob/master/CONTRIBUTING.md).
## Installing Pixelated
To run your own instance of Pixelated, follow these instructions: https://github.com/pixelated/puppet-pixelated#manual-installation
## Development
You like the idea and you want to run it locally, then before you have to install the following packages:
* [Vagrant](https://www.vagrantup.com/downloads.html), Vagrant is a tool that automates the setup of a virtual machine with the development environment
* A vagrant [compatible provider](https://www.vagrantup.com/docs/providers/), e.g. [Virtual Box](https://www.virtualbox.org/wiki/Downloads).
### Option 1: Pixelated User Agent without LEAP provider
1) Clone the repo and start the virtual machine (downloads 600MB, you may want get a coffee or tea in the meantime):
```
$ git clone https://github.com/pixelated/pixelated-user-agent.git
$ cd pixelated-user-agent
$ vagrant up
```
2) Log into the VM:
```
$ vagrant ssh
$ cd /vagrant
```
3) Register with a LEAP provider. You can create a developer account at our [Dev Provider](https://dev.pixelated-project.org/) (Please contact us at team@pixelated-project.org for an invite code) or you can use sample configurations.
4) If you created a developer account follow the step 4a to run the user agent, otherwise go to step 4b:
4a) Connect to the provider using your credentials. If the user agent starts up successfully, you will not see any other output.
```
$ pixelated-user-agent --host 0.0.0.0
Which provider do you want to connect to:
dev.pixelated-project.org
What’s your username registered on the provider:
username (the one you created in previous step)
Type your password:
******** (the one you created in previous step)
```
**Note**: For more convenience during development, you can also create a config file with your credentials (see [**Further Notes**](https://github.com/pixelated/pixelated-user-agent/blob/master/README.md#further-notes)).
4b) If you don't have a `dev.pixelated-project.org` account or just want to connect to our `try.pixelated-project.org` environment, we have some sample configurations for you.
Please navigate to the project root in your vagrant box with: `$ cd /vagrant`
Then you can connect to `try.pixelated-project.org` ...
* as Alice via: `$ pixelated-user-agent --host 0.0.0.0 -c try.alice.ini`
* as Bob via: `$ pixelated-user-agent --host 0.0.0.0 -c try.bob.ini`
5) Go to [localhost:3333](http://localhost:3333/). You should see a loading screen for a few seconds, then your inbox. If it sticks on the loading screen, check your terminal for errors, then [get help](https://pixelated-project.org/faq/#contact-the-project).
6) If you like console output, you can also run the tests to see if everything went according to plan.
```bash
vagrant@jessie:~ $ cd /vagrant
```
To run the tests:
```bash
vagrant@jessie:/vagrant $ make test
```
To run the functional tests:
```bash
vagrant@jessie:/vagrant $ make functional_tests
```
7) You're all set! We've prepared [a couple of issues labeled "Volunteer Task"](https://github.com/pixelated/pixelated-user-agent/labels/Volunteer%20task) that are a good place to dive into the project. Happy Hacking!
## How do I see the result of my changes?
For all **Python changes**, you will need to kill (Ctrl-C) the server and run `$ pixelated-user-agent --host 0.0.0.0` again.
For most **JavaScript** or **HTML changes**, you will just need to reload the browser.
For most **CSS or Handlebars templates changes**, you will also need to run: `$ cd /vagrant/web-ui && ./go build`
## Option 2: Pixelated User Agent + Leap Platform
You can install the Pixelated User Agent and the Leap Platform at once, just by running the following command on your console (this may take a while, please be patient):
```bash
curl https://raw.githubusercontent.com/pixelated/puppet-pixelated/master/vagrant_platform.sh | sh
```
Once installed, you can create accounts by visiting the LEAP Webapp at [localhost:4443/signup](https://localhost:4443/signup) and see Pixelated in action at [localhost:8080](https://localhost:8080/).
NOTE: Be aware that you will not be able to send mails outside, but you can test sending mails internally from one user to another.
## Running tests on your local machine
If you want to run the tests in your host machine outside of vagrant:
```
$ pip install virtualenv
$ cd <root/of/pixelated-user-agent>
$ make test
```
If you want to run the tests in your IDE on your host machine outside of vagrant, there's a bug in a LEAP library that can't handle symlinks to your local GPG installation.
To fix it, add the path to your GPG binary to your $PATH so that it is found before the symlink in `/usr/local/bin` (or similar).
See also, installations on native OS [below](#developer-setup-on-native-os).
## I think I might be able to hack together a quick-and-dirty lo-fi solution for the issue I’m working with… what do I do?
Do it the easy way first, and submit a pull request as a “work in progress” as soon as you have a quick-and-dirty solution (or even an unfinished solution) — that means you can get feedback from the other developers about whether you’re heading in the right direction sooner rather than later. Include “WIP” (work in progress) in the description of your pull request and ask for review, or feedback on anything specific.
# Further Notes
## Multi User Mode
To run the pixelated user agent multi user mode, please run the following:
```bash
vagrant@jessie:/vagrant$ pixelated-user-agent --host 0.0.0.0 --multi-user --provider=dev.pixelated-project.org
```
You will need to change `dev.pixelated-project.org` to the hostname of the leap provider that you will be using.
Once that is done, you can use by browsing to [http://localhost:3333](http://localhost:3333), where you will be prompted for your email username and password.
## Config file with credentials
The config file has to be in `ini` format, see for example
`try.alice.ini` or `try.bob.ini` in the root directory, or this one:
*credentials.ini*
```
[pixelated]
leap_server_name=dev.pixelated-project.org
leap_username=<your_username>
leap_password=<your_password>
```
To use it start the user agent like this:
`$ pixelated-user-agent --host 0.0.0.0 --config credentials.ini`
You can also include the host in the config file, as shown in the example files given above.
## Self-signed provider certs
You might also need to add your LEAP provider ssl certificate to pixelated manually for now, with the following steps:
The easiest way to get this is downloading if from https://your.provider.org/ca.crt.
Rename the certificate based on your provider domain name like this `your.leapprovider.org.crt` and put it into `services/pixelated/certificates/`.
## Misc
* You can access the guest OS shell via the command `vagrant ssh` run within the `pixelated-user-agent/` folder in the host OS.
* `/vagrant/` in the guest OS is mapped to the `pixelated-user-agent/` folder in the host OS. File changes on either side will reflect in the other.
* First time email sync could be slow, please be patient. This could be the case if you have a lot of emails already and it is the first time you setup the user agent on your machine.
* CTRL + \ will stop the server.
* For all backend changes, you will need to stop and restart the server again (Step 5 above).
* For most frontend changes, you will just need to reload the browser. Some changes (in particular, those involving css or handlebars) you will need to run:
```bash
vagrant@jessie:/vagrant$ make install_js
```
## Developer Setup On Native OS
Please ensure that you have an email user from your preferred leap provider (Step 3).
Details for developer installations [on OSX](#on-osx) and [Debian distributions](#on-debian-distributions) are explained below.
In case of any issues, please ping us on IRC ([#pixelated on irc.freenode.net](irc://irc.freenode.net/pixelated)), we will be available to help you from there.
### On OSX
First, you will need to install the [GPG tools](https://gpgtools.org/) for Mac.
Then, run the following sequence of commands:
```bash
$ curl https://raw.githubusercontent.com/pixelated/pixelated-user-agent/master/osx_setup.sh | sh
$ cd pixelated-user-agent && source ~/.virtualenv/user-agent-venv/bin/activate
```
Please note that you will have to activate the virtualenv anytime you work on a different terminal. This is done by simply running `$ source ~/.virtualenv/user-agent-venv/bin/activate` first.
Running the user agent and the various tests are the same as in the vagrant setup in step 4) and 6) above.
### On Debian distributions
This is the setup for developers. Please run the following commands:
```bash
$ curl https://raw.githubusercontent.com/pixelated/pixelated-user-agent/master/debian_setup.sh | bash
$ cd pixelated-user-agent && source ~/.virtualenv/user-agent-venv/bin/activate
```
Please note that you will have to activate the virtualenv anytime you work on a different terminal. This is done by simply running `$ source ~/.virtualenv/user-agent-venv/bin/activate` first.
Running the user agent and the various tests are the same as in the vagrant setup in step 4) and 6) above.
## Debian package
For people that just want to try the user agent, we have debian packages available in our [repository](http://packages.pixelated-project.org/debian/). To use it, you have to add it to your sources list:
```shell
echo "deb [arch=amd64] http://packages.pixelated-project.org/debian jessie-snapshots main" > /etc/apt/sources.list.d/pixelated.list
apt-key adv --keyserver pool.sks-keyservers.net --recv-key 287A1542472DC0E3
apt-get update
apt-get install pixelated-user-agent
```
for multi-user mode, change the last line above to
```shell
apt-get install pixelated-server
```
## Docker
For people who want to run the user agent on docker container can use the Dockerfile.
## How to translate the user interface
See: [Contributor's Guide](https://github.com/pixelated/pixelated-user-agent/blob/master/CONTRIBUTING.md)
|
