
diff options
| author | Felix Hammerl <fhammerl@thoughtworks.com> | 2016-03-31 17:58:51 +0200 |
|---|---|---|
| committer | Felix Hammerl <fhammerl@thoughtworks.com> | 2016-03-31 17:58:51 +0200 |
| commit | 62e18f6845c28676a5b0e3f794cacf29112a580e (patch) | |
| tree | 65b0496cc2b25d6f704641bd7da5faaa91b3697e /README.md | |
| parent | f4b7e198bc66ab42817c989d3efa1f13b41c7b4d (diff) | |
Added try it and installation sections
Diffstat (limited to 'README.md')
| -rw-r--r-- | README.md | 41 |
1 files changed, 31 insertions, 10 deletions
@@ -12,14 +12,24 @@ Here's a [podcast](https://soundcloud.com/thoughtworks/pixelated-why-secure-comm 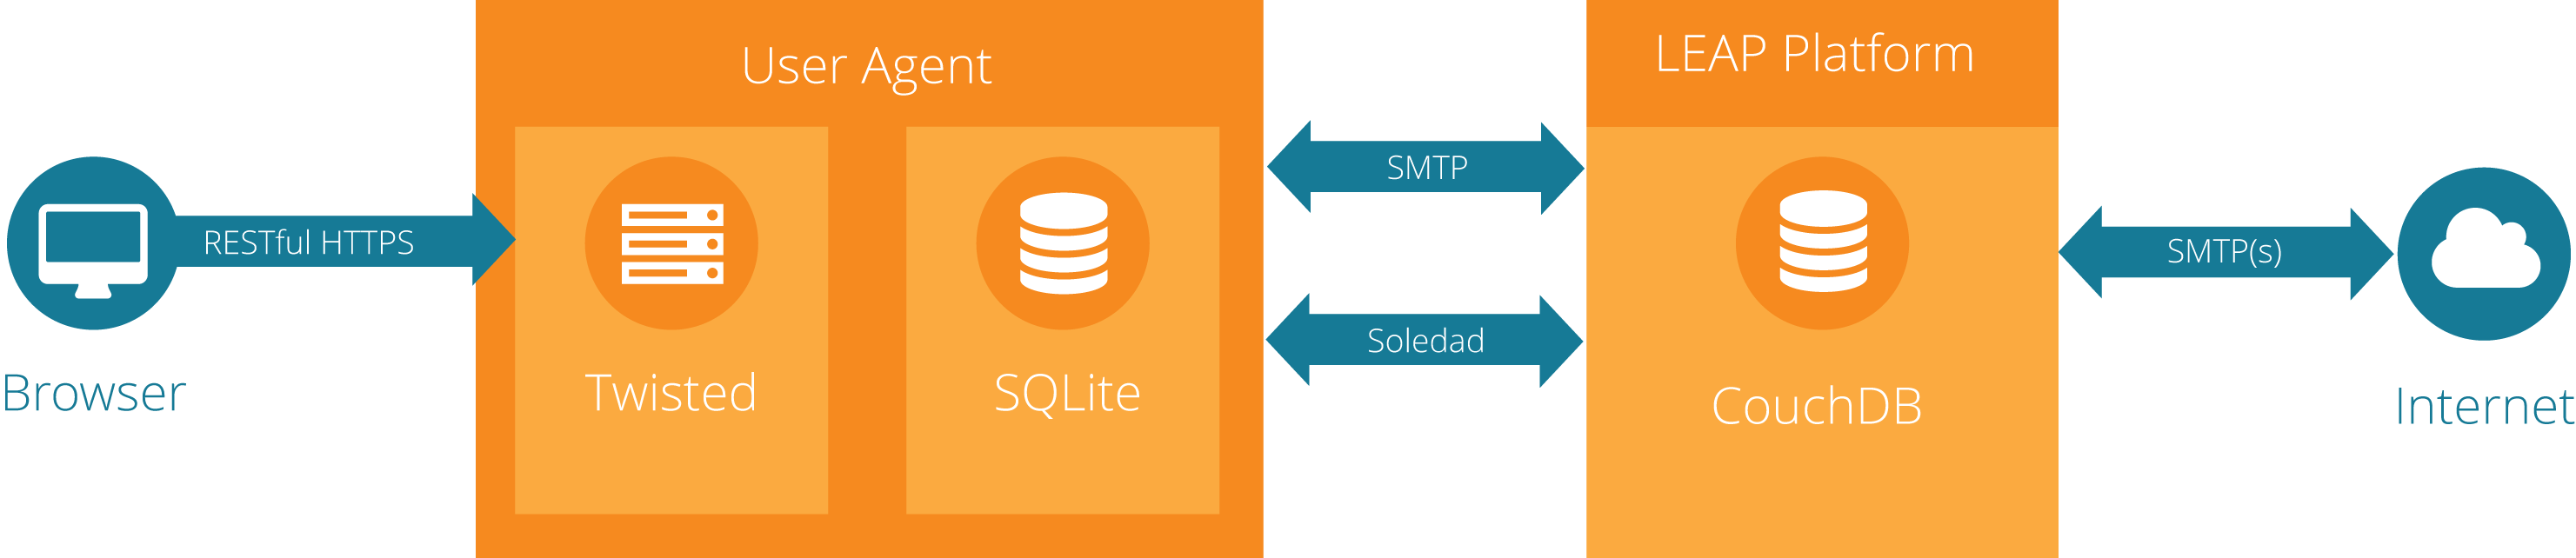 +## Try it! + +If you are curious, have a look at the pixelated web client, it as simple as clicking *[here!](https://try.pixelated-project.org:8080/)* + ## Getting started You are most welcome to contribute to the pixelated user agent code base. Please have a look at the [contributions how to](https://github.com/pixelated/pixelated-user-agent/blob/master/CONTRIBUTING.md). +## Installing Pixelated + +You like the idea and you want to run it locally, then before you have to install the following packages: -1) Install [Vagrant](https://www.vagrantup.com/downloads.html) and a vagrant [compatible provider](https://www.vagrantup.com/docs/providers/), e.g. [Virtual Box](https://www.virtualbox.org/wiki/Downloads). Vagrant is a tool that automates the setup of a virtual machine with the development environment in your computer. Inside the virtual machine's filesystem, this repository will be automatically mounted in the `/vagrant` folder. +* [Vagrant](https://www.vagrantup.com/downloads.html), Vagrant is a tool that automates the setup of a virtual machine with the development environment +* A vagrant [compatible provider](https://www.vagrantup.com/docs/providers/), e.g. [Virtual Box](https://www.virtualbox.org/wiki/Downloads). -2) Clone the repo and start the virtual machine (downloads 600MB): +### Option 1: Pixelated User Agent without LEAP provider + +1) Clone the repo and start the virtual machine (downloads 600MB, you may want get a coffee or tea in the meantime): ``` $ git clone https://github.com/pixelated/pixelated-user-agent.git @@ -27,15 +37,15 @@ $ cd pixelated-user-agent $ vagrant up ``` -3) Log into the VM: +2) Log into the VM: ``` $ vagrant ssh ``` -4) Register with a LEAP provider. You can create a developer account at our [Dev Provider](https://dev.pixelated-project.org/). Please contact us at team@pixelated-project.org for an invite code. +3) Register with a LEAP provider. You can create a developer account at our [Dev Provider](https://dev.pixelated-project.org/). Please contact us at team@pixelated-project.org for an invite code. -5) Run the user agent: +4) Run the user agent: Please note: If you don't have an account on any provider, go directly to step 6b). @@ -52,11 +62,11 @@ Type your password: ******** (the one you created in previous step) ``` -6a) Connect to the provider using your credentials, as shown in step 5 above. If the user agent starts up successfully, you will not see any other output. +5a) Connect to the provider using your credentials, as shown in step 5 above. If the user agent starts up successfully, you will not see any other output. **Note**: For more convenience during development, you can also create a config file with your credentials (see **Further Notes**). -6b) If you don't have a `dev.pixelated-project.org` account or just want to connect to our `try.pixelated-project.org` environment, we have some sample configurations for you. +5b) If you don't have a `dev.pixelated-project.org` account or just want to connect to our `try.pixelated-project.org` environment, we have some sample configurations for you. Please navigate to the project root in your vagrant box with: `$ cd /vagrant` @@ -65,9 +75,9 @@ Then you can connect to `try.pixelated-project.org` ... * as Alice via: `$ pixelated-user-agent --host 0.0.0.0 -c try.alice.ini` * as Bob via: `$ pixelated-user-agent --host 0.0.0.0 -c try.bob.ini` -7) Go to [localhost:3333](http://localhost:3333/). You should see a loading screen for a few seconds, then your inbox. If it sticks on the loading screen, check your terminal for errors, then [get help](https://pixelated-project.org/faq/#contact-the-project). +6) Go to [localhost:3333](http://localhost:3333/). You should see a loading screen for a few seconds, then your inbox. If it sticks on the loading screen, check your terminal for errors, then [get help](https://pixelated-project.org/faq/#contact-the-project). -8) If you like console output, you can also run the tests to see if everything went according to plan. +7) If you like console output, you can also run the tests to see if everything went according to plan. ```bash (user-agent-venv)vagrant@jessie:~$ cd /vagrant @@ -97,8 +107,19 @@ To run the functional tests: (user-agent-venv)vagrant@jessie:/vagrant/service$ cd .. ``` -9) You're all set! We've prepared [a couple of issues labeled "Volunteer Task"](https://github.com/pixelated/pixelated-user-agent/labels/Volunteer%20task) that are a good place to dive into the project. Happy Hacking! +7) You're all set! We've prepared [a couple of issues labeled "Volunteer Task"](https://github.com/pixelated/pixelated-user-agent/labels/Volunteer%20task) that are a good place to dive into the project. Happy Hacking! + +## Option 2: Pixelated User Agent + Leap Platform + +You can install the Pixelated User Agent and the Leap Platform at once, just by running the following command on your console (this may take a while, please be patient): + +```bash + curl https://raw.githubusercontent.com/pixelated/puppet-pixelated/master/vagrant_platform.sh | sh +``` + + Once installed, you can create accounts by visiting the LEAP Webapp at [localhost:4443/signup](https://localhost:4443/signup) and see Pixelated in action at [localhost:8080](https://localhost:8080/). + NOTE: Be aware that you will not be able to send mails outside, but you can test sending mails internally from one user to another. ## Running tests inside your local IDE |