1
2
3
4
5
6
7
8
9
10
11
12
13
14
15
16
17
18
19
20
21
22
23
24
25
26
27
28
29
30
31
32
33
34
35
36
37
38
39
40
41
42
43
44
45
46
47
48
49
50
51
52
53
54
55
56
57
58
59
60
61
62
63
64
65
66
67
68
69
70
71
72
73
74
75
76
77
78
79
80
81
82
83
84
85
86
87
88
89
90
91
92
93
94
95
96
97
98
99
100
101
102
103
104
105
106
107
108
109
110
111
112
113
114
|
puppet-pixelated
================
[](https://snap-ci.com/pixelated/puppet-pixelated/branch/master)
**Pixelated is in an early stage of development! Things may not work to their full extent yet**
This puppet module provides a simple way to add Pixelated to a running [LEAP Platform](https://leap.se/en/docs/platform).
It sets up the [Pixelated User-Agent](https://github.com/pixelated/pixelated-user-agent).
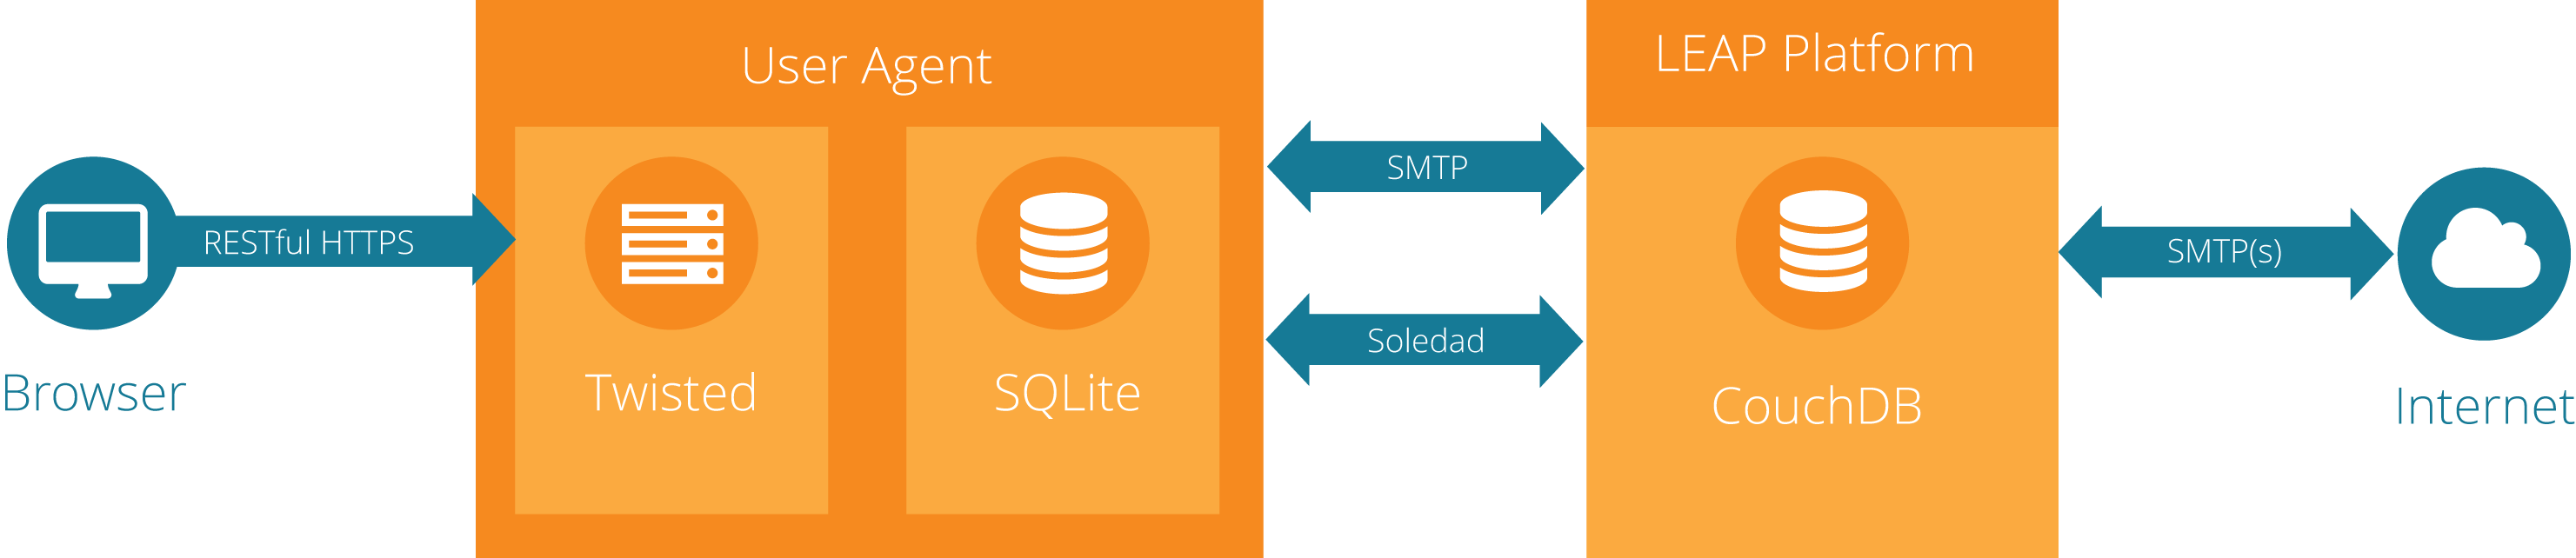
### High level Architecture
#### Pixelated Platform
Testing Pixelated
=================
If you want to have a look at pixelated, the easiest way ist to run everything inside [vagrant](https://www.vagrantup.com/). The following command
installs a working LEAP Platform, the pixelated-user-agent. You can create accounts
by visiting the LEAP Webapp at <https://localhost:4443/signup> and see Pixelated in action at <https://localhost:8080/>.
Be aware that you will not be able to send mails outside, but you can test sending mails internally from one user to another.
```bash
curl https://raw.githubusercontent.com/pixelated/puppet-pixelated/master/vagrant_platform.sh | sh
```
Manual installation
===================
## 1 Creating a LEAP Provider
Pixelated is built on top of LEAP, so in order to have a Pixelated Platform, you need to have a LEAP Platform.
In this example, we use a single node setup. Please refer to <https://leap.se/en/docs/platform/tutorials/single-node-email> for help with setting up a LEAP provider.
We assume that you have the LEAP platform and the configuration for your LEAP node on your local workstation. If you followed the tutorial you should have the following directories:
* `~/leap/leap_plaform`: the LEAP platform itself
* `~/leap/example`: the configuration for your LEAP provider node
Ideally you have run `leap deploy` and `leap test` to set up the node on a server and verify that the installation actually works.
### 2 Adding Pixelated to your existing LEAP configuration
This puppet module take care of (almost) everything. It will install the pixelated-user-agent.
Please note that currently, you need proper DNS entries for your provider domain and all of its subdomains (`hostname1.DOMAIN`, `DOMAIN`, `api.DOMAIN` and `nicknym.DOMAIN`).
You can access your LEAP provider with only local DNS overrides, but you cannot do this for the pixelated user agent.
Add the pixelated-platform files to `files/puppet` inside your LEAP configuration folder.
```bash
cd ~/leap/example
mkdir -p files/puppet/modules
```
The documentation for the installation of the LEAP Platform suggests that you make the configuration folder (`~/leap/example` is the name they suggest) versioned using Git to make it easier to track and undo any changes on the configuration. If you followed this suggestion of the tutorial, the easiest way to get the Pixelated platform is to add it as a submodule.
```bash
git submodule add https://github.com/pixelated/puppet-pixelated.git files/puppet/modules/pixelated
```
If you haven't added version control to your LEAP configuration, you can simply clone the Pixelated platform files into your node configuration.
```bash
git clone https://github.com/pixelated/puppet-pixelated.git files/puppet/modules/pixelated
```
Include the `::pixelated` class in the `custom` class, which gets automatically applied by the leap_platform.
```bash
mkdir -p files/puppet/modules/custom/manifests
echo '{}' > services/pixelated.json
echo 'class custom { include ::pixelated}' > files/puppet/modules/custom/manifests/init.pp
```
### 3 Installing Pixelated on the LEAP provider node
With Pixelated added to the configuration simply re-run the LEAP deployment.
leap deploy
leap test
When this completes Pixelated should be ready and available on port 8080 on your LEAP provider.
Have fun!
### Running Funcional Tests (local)
From:
```$cd /puppet-pixelated/files/functional-tests/```
Install python dependencies:
```$pip install -r test_requirements.txt```
Install phantomjs:
```$npm install phantomjs -g```
Setting staging host as pixelated-platform on the TESTHOST environment variable:
```$export TESTHOST=staging.pixelated-project.org```
And to run:
$behave
To run a feature:
```$behave -t @mail_to_myself```
To run a set of tests:
```$behave -t @staging```
|
